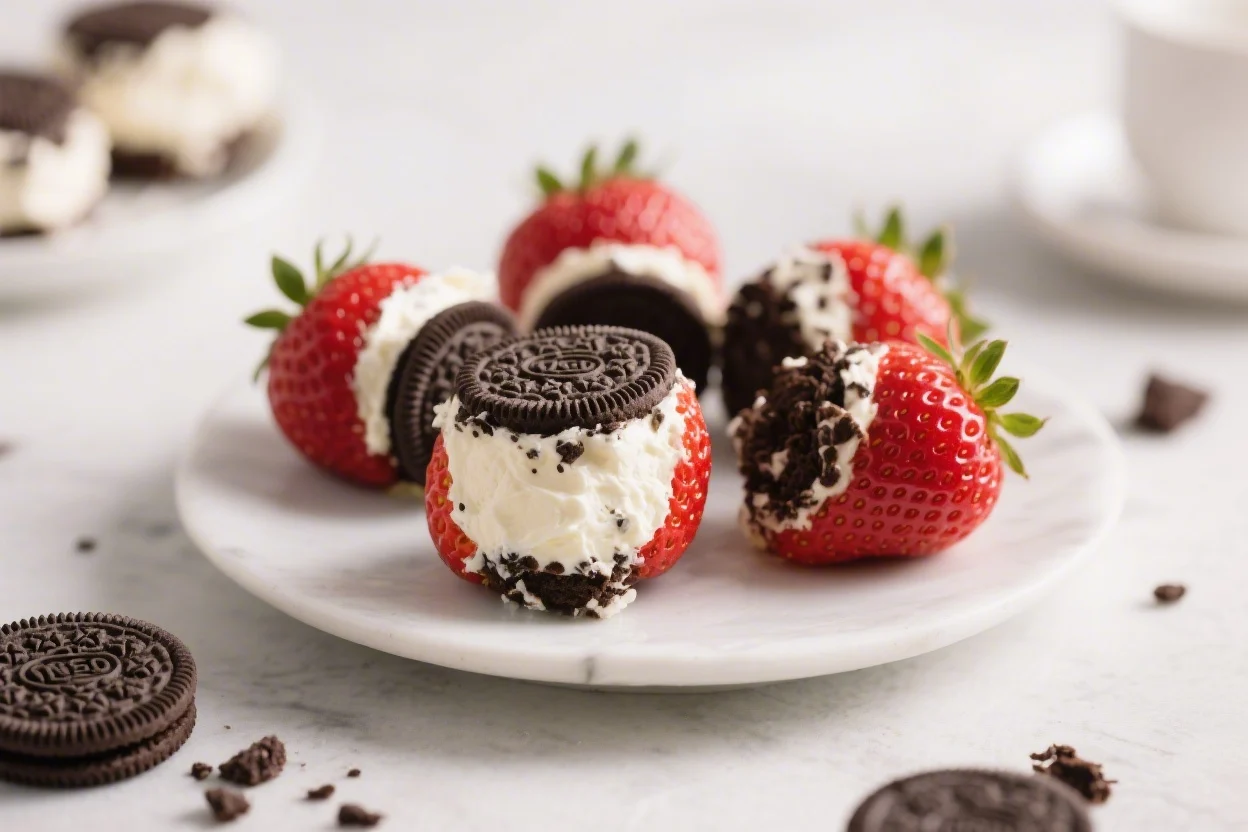
If you love easy desserts that look fancy without any fuss, these Oreo cheesecake stuffed strawberries are your new go-to. They’re creamy, crunchy, and juicy all at once, and you don’t need an oven or special equipment. Think of them as bite-size cheesecakes wrapped in fresh berries, with just the right amount of Oreo magic.
They’re perfect for parties, date nights, or a treat-yourself moment on a weeknight. And the best part? You can make them in under 30 minutes.
Oreo Cheesecake Stuffed Strawberries the Fancy No-Bake Treat You Need – A Simple, Crowd-Pleasing Dessert
Ingredients
Method
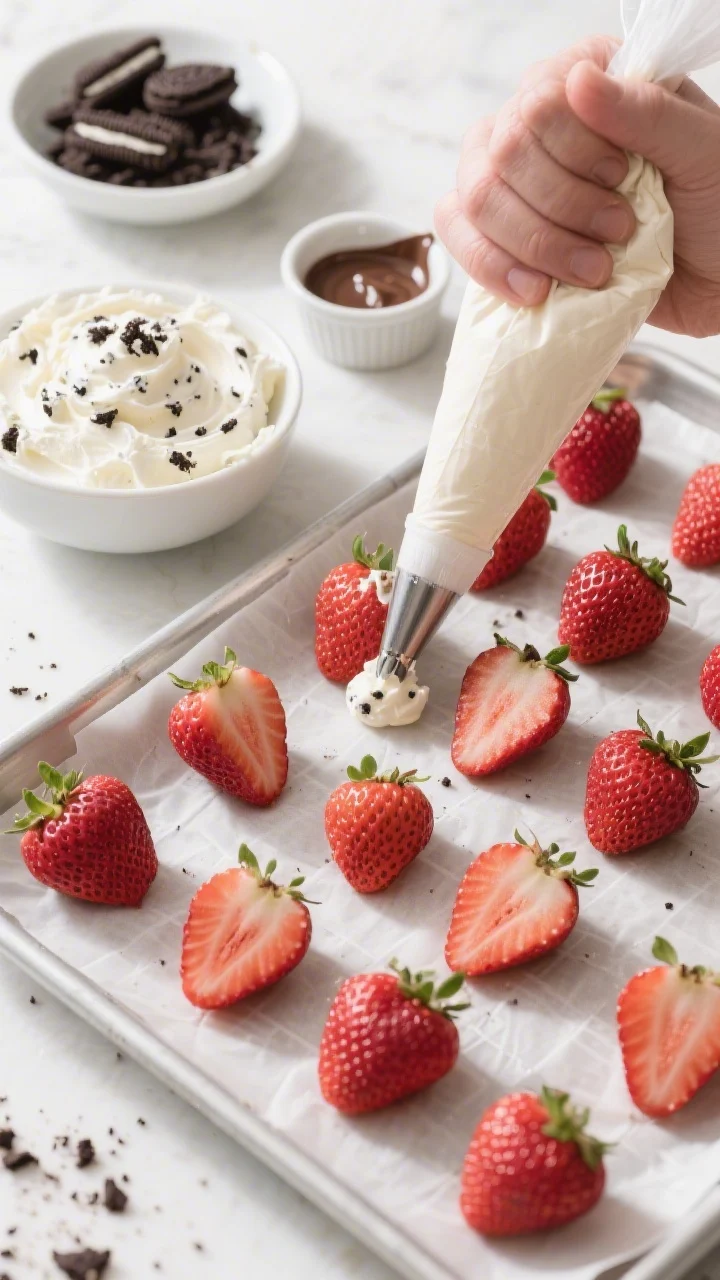
- Prep the strawberries. Rinse and pat them completely dry. Cut off the stems, then use a small paring knife or melon baller to hollow out the centers. If they don’t stand up on their own, slice a thin layer off the bottom to steady them.
- Crush the Oreos. Place the cookies in a zip-top bag and crush with a rolling pin until you have fine crumbs. Reserve a few tablespoons for sprinkling on top.
- Make the cheesecake filling. In a bowl, beat softened cream cheese with powdered sugar and vanilla until smooth and fluffy. Add heavy cream a tablespoon at a time until the mixture is creamy and pipeable. If using whipped topping, gently fold it in instead of cream.
- Add Oreos to the filling. Stir in about 1/2 to 2/3 of the Oreo crumbs. Taste and adjust sweetness if needed. A small pinch of salt sharpens the flavor.
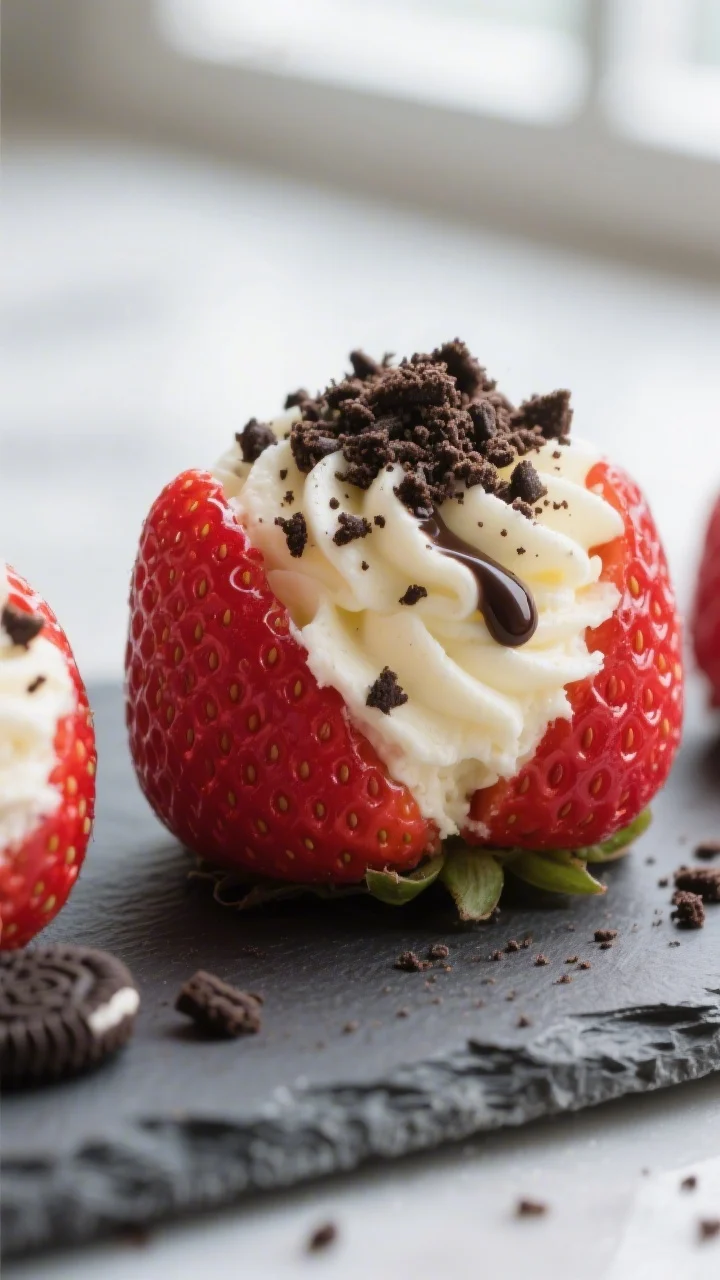
- Fill the strawberries. Spoon the filling into a piping bag or a plastic bag with the corner snipped. Pipe the cheesecake mixture into each strawberry until slightly mounded.
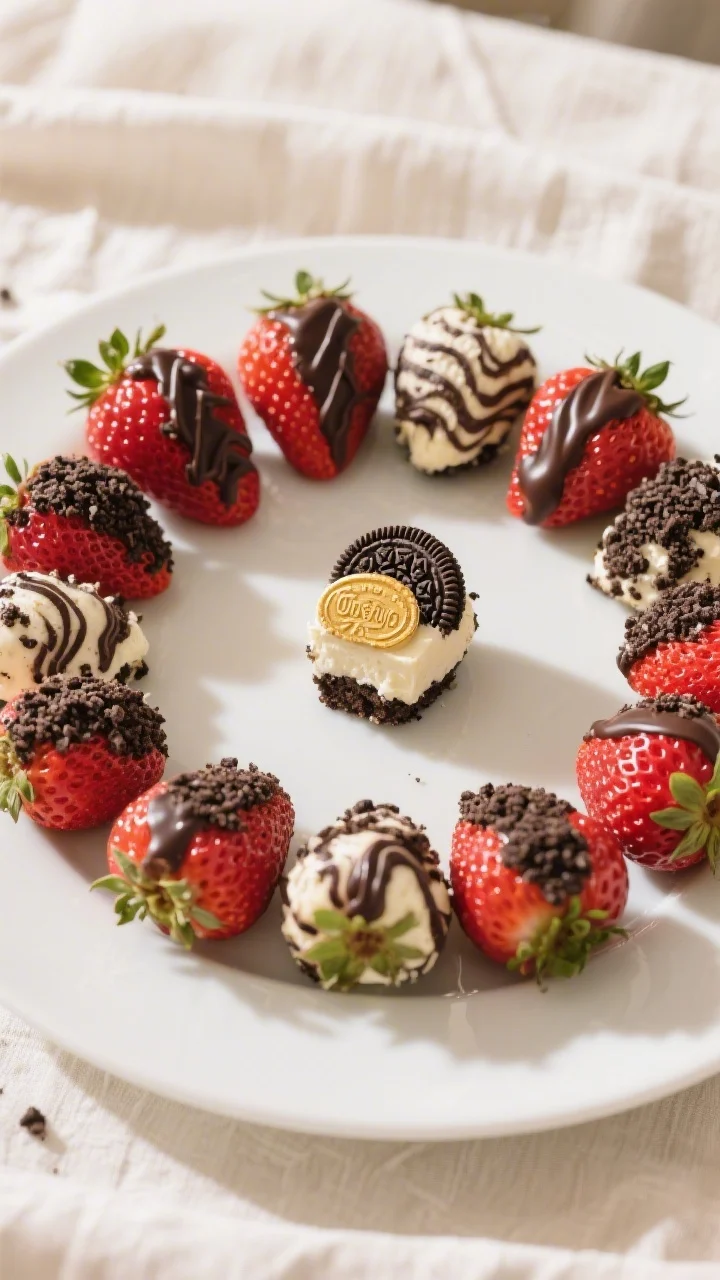
- Finish with crunch. Sprinkle the tops with the reserved Oreo crumbs. For extra flair, drizzle with a little melted chocolate.
- Chill briefly (optional but helpful). Refrigerate for 15–30 minutes to set the filling and firm up the berries. Serve cool, not ice-cold, for the best texture.
What Makes This Special
These stuffed strawberries feel like something you’d order at a trendy dessert bar, but they’re surprisingly simple to pull off.
The filling is smooth and tangy with a hint of vanilla, balanced by the sweet crunch of crushed Oreos. The strawberries add freshness and keep each bite light, not heavy. There’s no baking, no long chill time, and no complicated steps—just straightforward ingredients doing their thing.
It’s a dessert that looks impressive on a platter and tastes even better than it looks.
Shopping List
- Strawberries (1 to 1.5 pounds, large and firm)
- Cream cheese (8 ounces, full-fat for best texture, softened)
- Powdered sugar (1/3 to 1/2 cup, to taste)
- Vanilla extract (1 teaspoon)
- Heavy cream or whipped topping (2–3 tablespoons heavy cream, or 1/2 cup whipped topping)
- Oreos (10–12 cookies, plus extra for garnish if you like)
- Optional add-ins: Pinch of salt, lemon zest, or a few mini chocolate chips
- Optional garnish: Melted chocolate for drizzling
Instructions
- Prep the strawberries. Rinse and pat them completely dry. Cut off the stems, then use a small paring knife or melon baller to hollow out the centers. If they don’t stand up on their own, slice a thin layer off the bottom to steady them.
- Crush the Oreos. Place the cookies in a zip-top bag and crush with a rolling pin until you have fine crumbs.
Reserve a few tablespoons for sprinkling on top.
- Make the cheesecake filling. In a bowl, beat softened cream cheese with powdered sugar and vanilla until smooth and fluffy. Add heavy cream a tablespoon at a time until the mixture is creamy and pipeable. If using whipped topping, gently fold it in instead of cream.
- Add Oreos to the filling. Stir in about 1/2 to 2/3 of the Oreo crumbs.
Taste and adjust sweetness if needed. A small pinch of salt sharpens the flavor.
- Fill the strawberries. Spoon the filling into a piping bag or a plastic bag with the corner snipped. Pipe the cheesecake mixture into each strawberry until slightly mounded.
- Finish with crunch. Sprinkle the tops with the reserved Oreo crumbs.
For extra flair, drizzle with a little melted chocolate.
- Chill briefly (optional but helpful). Refrigerate for 15–30 minutes to set the filling and firm up the berries. Serve cool, not ice-cold, for the best texture.
How to Store
- Short term: Keep them in an airtight container in the fridge for up to 24 hours. Line the container with paper towels to absorb moisture.
- Avoid stacking: Arrange in a single layer so they don’t crush or weep into each other.
- Best freshness window: They taste best the day you make them, ideally within 6–8 hours.
- Not freezer-friendly: Freezing alters the strawberry texture and makes them watery when thawed.
Benefits of This Recipe
- No oven needed: Great for warm days or quick dessert emergencies.
- Fast and flexible: Ready in under 30 minutes, with easy ingredient swaps.
- Portion controlled: Naturally bite-sized, so perfect for sharing and snacking.
- Balanced flavors: Fresh berries keep the rich cheesecake and Oreo combo from feeling too heavy.
- Beautiful presentation: Looks party-ready with minimal effort or skill.
Pitfalls to Watch Out For
- Wet strawberries: If they aren’t fully dry before filling, the cheesecake mixture can slip out and crumbs won’t stick.
Pat dry carefully.
- Runny filling: Add cream slowly. If the mixture gets too loose, mix in more cream cheese or a little extra powdered sugar.
- Over-crushing the berries: Hollow gently. If you scoop too much, they can collapse or leak.
- Making them too early: Strawberries release moisture over time.
For best texture, assemble close to serving.
- Crumb sogginess: Add the Oreo topping just before serving if you want it extra crunchy.
Variations You Can Try
- Golden Oreo twist: Swap in Golden Oreos for a vanilla-and-berry flavor that’s lighter but still rich.
- Chocolate-dipped base: Dip the bottoms in melted dark or white chocolate and let set before filling for extra crunch and a clean look.
- Cookies and cream swirl: Don’t fully mix the Oreo crumbs into the filling—fold lightly for a marbled look.
- Lemon cheesecake vibe: Add 1 teaspoon lemon zest and a squeeze of juice to the filling. Pair with Golden Oreos.
- Mini chip upgrade: Stir in mini chocolate chips for texture and double-chocolate flavor.
- Gluten-free option: Use gluten-free sandwich cookies; everything else stays the same.
- Protein bump: Mix in a spoonful of plain Greek yogurt to the cream cheese, then sweeten to taste. Expect a tangier, lighter filling.
- Nutty crunch: Finish with finely chopped toasted almonds or hazelnuts along with Oreo crumbs.
FAQ
Can I use low-fat cream cheese?
Yes, but the texture will be softer and less rich.
If you go low-fat, use a little less cream or fold in whipped topping to maintain structure.
Do I need a mixer?
A hand mixer makes the filling smoother, but you can use a sturdy whisk if the cream cheese is fully softened. Beat until it’s lump-free and fluffy.
How far in advance can I make these?
Make them the same day for best results. You can prep the filling and crushed Oreos a day ahead and store separately, then assemble a few hours before serving.
What if my strawberries are small?
Use more berries and pipe smaller swirls.
You can also slice them in half and add a small dollop of filling on each half, then sprinkle with crumbs.
Can I make them less sweet?
Reduce the powdered sugar to 1/4 cup and skip the chocolate drizzle. A pinch of salt and a bit of lemon zest brighten the flavor without extra sugar.
How do I keep the filling from being grainy?
Use powdered sugar (not granulated), fully soften the cream cheese, and beat until smooth before adding cream. If needed, sieve the powdered sugar first.
What’s the best way to fill without a piping bag?
Use a small spoon or a zip-top bag with a corner snipped.
A star tip looks fancy, but a simple cut corner works just fine.
Can I use other cookies?
Absolutely. Try chocolate wafers, Biscoff, Golden Oreos, or graham crackers for a classic cheesecake feel.
Final Thoughts
Oreo cheesecake stuffed strawberries hit that sweet spot between fancy and fuss-free. They’re fast, gorgeous, and guaranteed to disappear from any platter you set out.
Keep a block of cream cheese and a sleeve of Oreos in the pantry, and you’re always minutes away from a show-stopping treat. Whether you’re hosting, gifting, or just craving something special, this no-bake recipe delivers every time. Simple ingredients, big payoff—that’s the kind of dessert worth keeping on repeat.
Printable Recipe Card
Want just the essential recipe details without scrolling through the article? Get our printable recipe card with just the ingredients and instructions.