If you love quick desserts that actually taste amazing, these Frozen Peanut Butter Nutella Cups will be your new favorite. They’re sweet, salty, chocolaty, and creamy—all in one bite. No oven, no fancy equipment, and no waiting around for batter to bake.
Just mix, layer, and freeze. They’re perfect for hot days, late-night cravings, or an easy treat to share.

Frozen Peanut Butter Nutella Cups the Ultimate No-Bake Sweet Treat – Simple, Creamy, and Satisfying
Ingredients
Method
- Prep your tray. Line a mini muffin pan with 24 paper liners. Clear some freezer space so the tray can sit flat.
- Make the filling. In a bowl, stir together the peanut butter, Nutella, maple syrup, vanilla, and a pinch of fine sea salt. Mix until smooth and glossy. If it’s too thick, warm it for 10–15 seconds in the microwave to loosen.
- Melt the chocolate base. In a microwave-safe bowl, combine 3/4 cup chocolate chips with 1 1/2 tablespoons coconut oil. Microwave in 20–30 second bursts, stirring between each, until just melted and smooth. You can also melt over a double boiler.
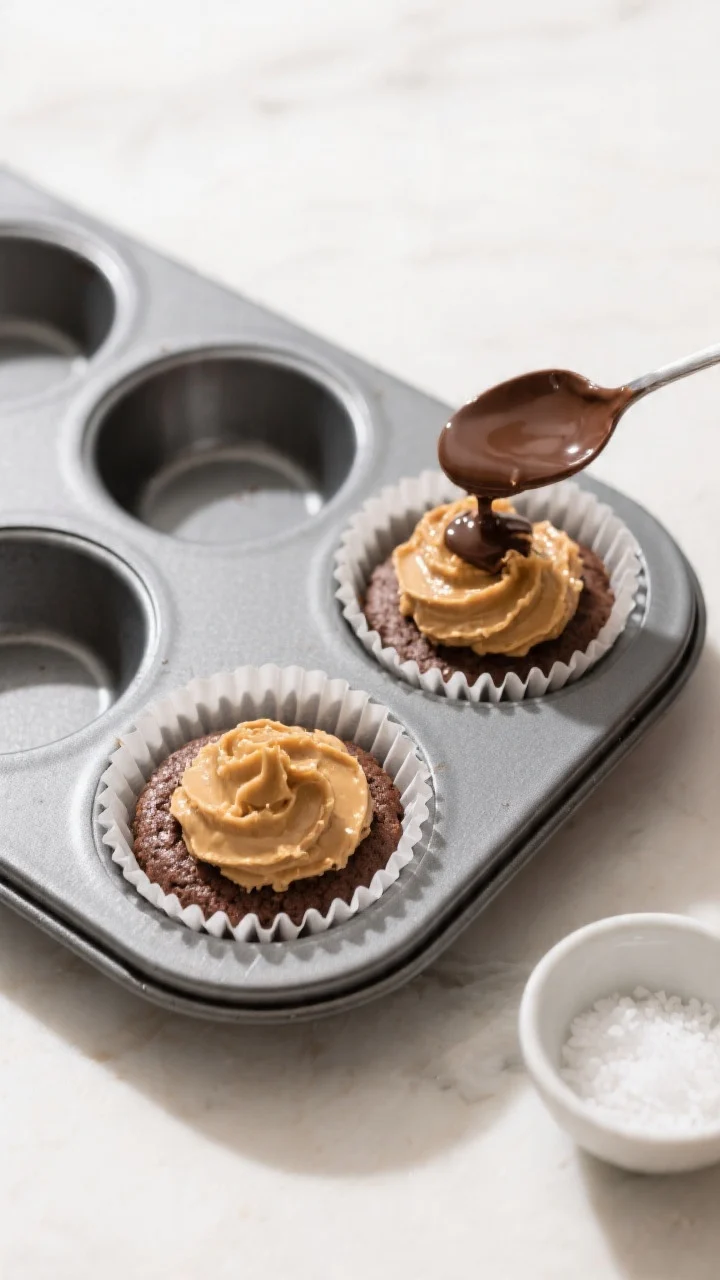
- Create the bottom layer. Spoon about 1 teaspoon of melted chocolate into each liner. Tilt the pan or use the back of a spoon to spread it slightly up the sides. Freeze for 8–10 minutes to set.
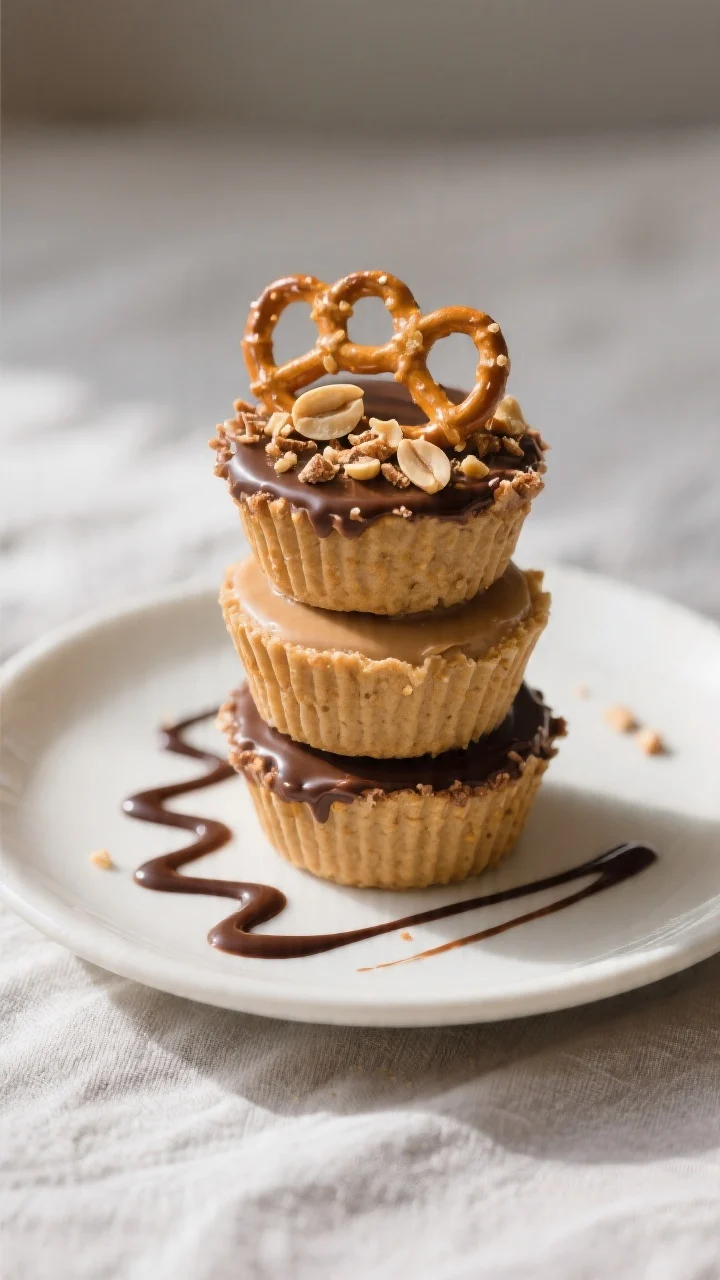
- Add the filling. Scoop about 1 heaping teaspoon of the peanut butter Nutella mixture onto each chocolate base. Press gently to flatten without touching the liner edges. If you’re adding crunch—like crushed pretzels or chopped nuts—sprinkle a small pinch on top now and press lightly.
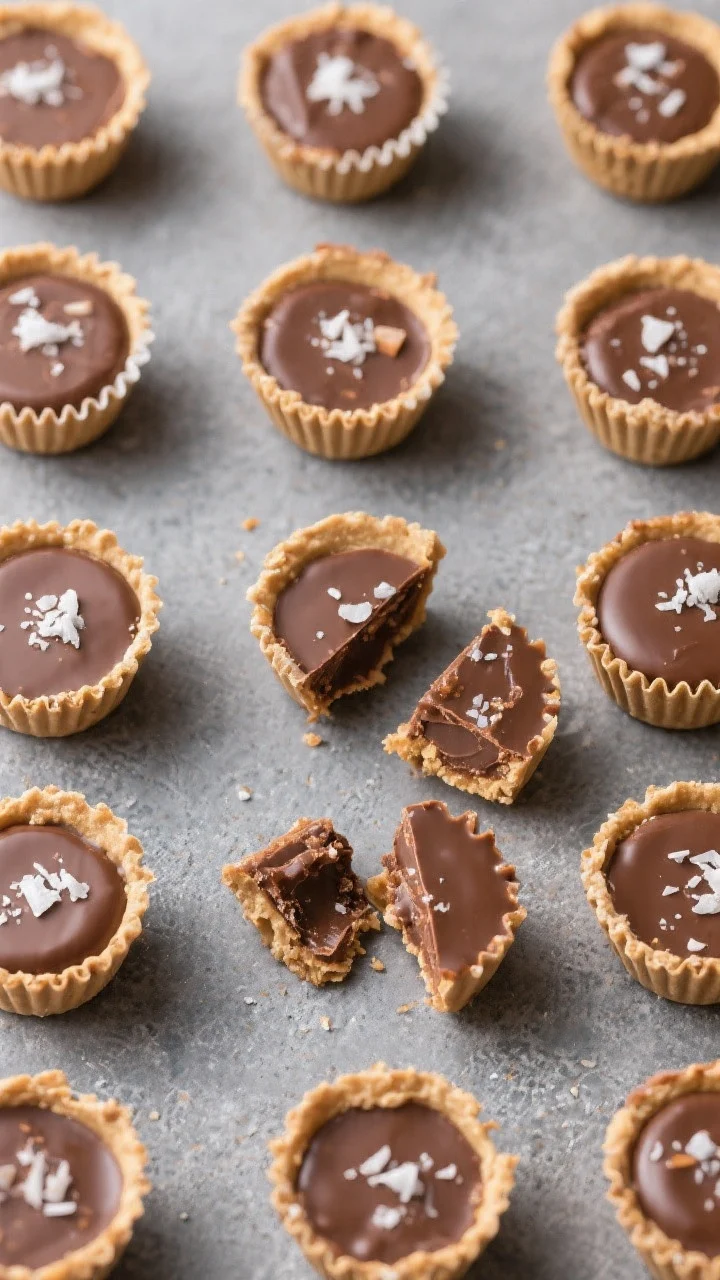
- Top with chocolate. Melt the remaining 3/4 cup chocolate chips with 1 1/2 tablespoons coconut oil. Spoon enough over each cup to fully cover the filling and seal the edges. Tap the tray gently on the counter to smooth the tops.
- Finish and freeze. Sprinkle a few flakes of sea salt on top for contrast. Freeze for 25–35 minutes, or until firm to the touch.
- Serve. Pop a cup out of the liner and take a bite. For the best texture, let them sit at room temperature for 2–3 minutes before eating so the centers turn creamy.
What Makes This Special
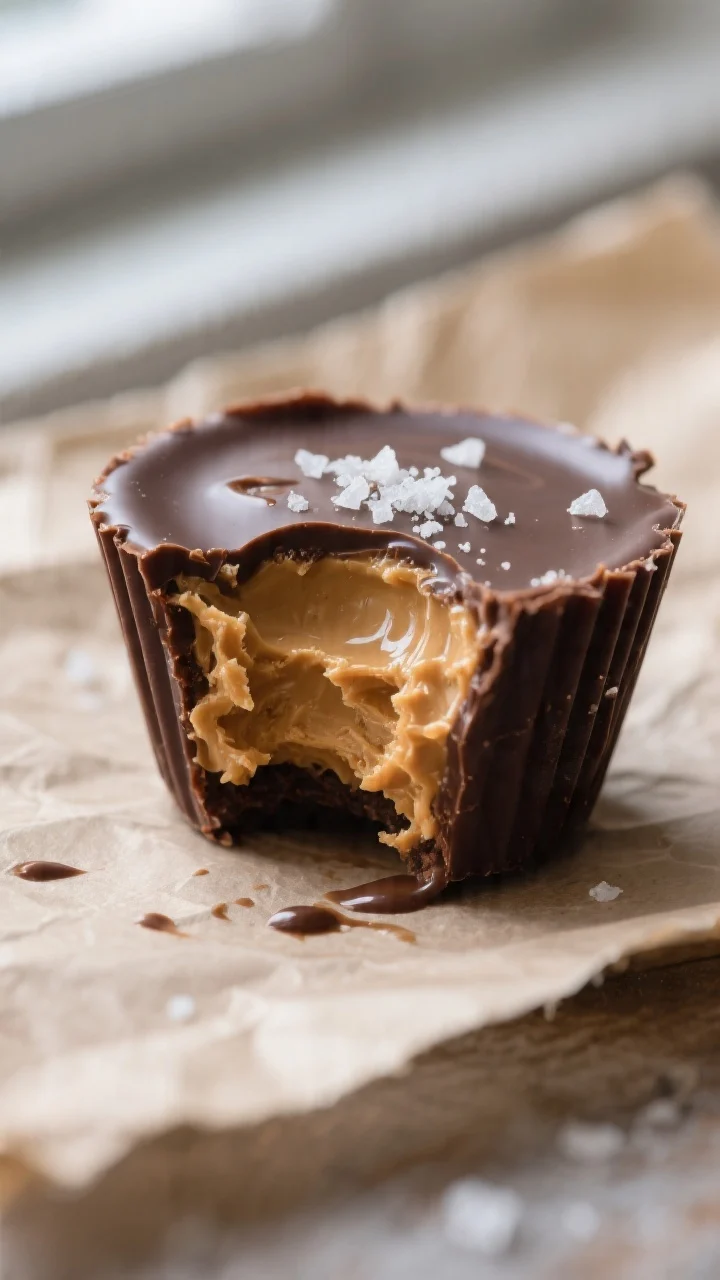
These cups are all about bold flavor with almost zero effort. The combination of peanut butter and Nutella creates a rich, velvety texture that stays firm yet fudgy straight from the freezer.
A simple chocolate shell adds snap, while a pinch of salt makes the sweetness pop. They’re also naturally portioned, so you get just enough indulgence without going overboard. Best of all, you can customize them endlessly—add crunch, switch nut butters, or make them dairy-free.
What You’ll Need
- Creamy peanut butter (natural or regular, unsweetened preferred): 3/4 cup
- Nutella or chocolate-hazelnut spread: 1/2 cup
- Maple syrup or honey: 2–3 tablespoons (adjust to taste)
- Vanilla extract: 1 teaspoon
- Fine sea salt: a pinch, plus flaky salt for topping (optional)
- Coconut oil (refined for no coconut flavor): 3 tablespoons, divided
- Dark or semi-sweet chocolate chips: 1 1/2 cups
- Mini muffin liners and a mini muffin tray (or regular liners and tray)
- Optional add-ins: crushed pretzels, chopped roasted peanuts or hazelnuts, shredded coconut, or rice crisps
How to Make It
- Prep your tray. Line a mini muffin pan with 24 paper liners.
Clear some freezer space so the tray can sit flat.
- Make the filling. In a bowl, stir together the peanut butter, Nutella, maple syrup, vanilla, and a pinch of fine sea salt. Mix until smooth and glossy. If it’s too thick, warm it for 10–15 seconds in the microwave to loosen.
- Melt the chocolate base. In a microwave-safe bowl, combine 3/4 cup chocolate chips with 1 1/2 tablespoons coconut oil.
Microwave in 20–30 second bursts, stirring between each, until just melted and smooth. You can also melt over a double boiler.
- Create the bottom layer. Spoon about 1 teaspoon of melted chocolate into each liner. Tilt the pan or use the back of a spoon to spread it slightly up the sides.
Freeze for 8–10 minutes to set.
- Add the filling. Scoop about 1 heaping teaspoon of the peanut butter Nutella mixture onto each chocolate base. Press gently to flatten without touching the liner edges. If you’re adding crunch—like crushed pretzels or chopped nuts—sprinkle a small pinch on top now and press lightly.
- Top with chocolate. Melt the remaining 3/4 cup chocolate chips with 1 1/2 tablespoons coconut oil.
Spoon enough over each cup to fully cover the filling and seal the edges. Tap the tray gently on the counter to smooth the tops.
- Finish and freeze. Sprinkle a few flakes of sea salt on top for contrast. Freeze for 25–35 minutes, or until firm to the touch.
- Serve. Pop a cup out of the liner and take a bite.
For the best texture, let them sit at room temperature for 2–3 minutes before eating so the centers turn creamy.
Storage Instructions
- In the freezer: Store in an airtight container or a zip-top bag for up to 2 months. Separate layers with parchment to prevent sticking.
- In the fridge: If you prefer a softer bite, keep them refrigerated for up to 1 week. They’ll be fudgier and slightly less firm.
- For serving: From the freezer, let sit 2–5 minutes before eating.
Don’t leave them out for long on a warm day—they’ll soften quickly.
Health Benefits
- Healthy fats and satiety: Peanut butter provides monounsaturated fats and some protein, which help you feel satisfied with fewer bites.
- Portion control built in: The mini format makes it easier to enjoy a treat without overdoing it.
- Lower added sugar (your choice): You control the sweetness with maple syrup or honey, and dark chocolate keeps it from getting cloying.
- Energy boost: Nuts and chocolate offer quick fuel for a pick-me-up without a heavy dessert crash, especially if you use darker chocolate.
What Not to Do
- Don’t skip the coconut oil in the chocolate. It helps the shell set with a clean snap and makes it easier to bite straight from the freezer.
- Don’t use runny, separated nut butter without stirring. Excess oil will make the filling greasy and the layers won’t set as nicely. Stir well or use a no-stir variety.
- Don’t over-microwave the chocolate. Burnt chocolate turns grainy and bitter. Heat in short bursts and stir often.
- Don’t overfill the liners. If the filling touches the edges, the top chocolate layer won’t seal and can crack or leak.
- Don’t skip the salt. Even a small pinch balances the sweetness and makes the flavors pop.
Variations You Can Try
- Crunch lovers: Add crushed pretzels, chopped peanuts, hazelnuts, or rice crisps between the filling and top chocolate.
- Almond twist: Swap peanut butter for almond butter and add a few drops of almond extract for a bakery-style flavor.
- Dairy-free: Use dairy-free chocolate chips and confirm your Nutella alternative is dairy-free.
Keep the refined coconut oil for a neutral flavor.
- Extra dark: Use 70–85% dark chocolate and reduce the maple syrup by 1 tablespoon for a more grown-up taste.
- Mocha vibe: Stir 1 teaspoon espresso powder into the melted chocolate for a subtle coffee kick.
- Peanut butter forward: Skip Nutella and add 2 tablespoons cocoa powder to the filling with a bit more sweetener.
- Salted caramel: Drizzle a tiny bit of thick caramel over the filling before sealing with chocolate, then top with flaky salt.
FAQ
Can I make these without coconut oil?
Yes, but the texture will differ. Replace with 1–2 teaspoons of neutral oil or a small pat of butter per 3/4 cup of chocolate. The shell may be slightly softer and less glossy.
What if I only have regular muffin liners?
You can use a standard muffin tin.
Just increase the amounts per cup: about 2 teaspoons chocolate base, 1–1 1/2 tablespoons filling, and enough chocolate to cover. They’ll be larger and may need an extra 5–10 minutes to freeze.
My chocolate seized—what happened?
Water or steam likely got into the bowl, or it overheated. Try whisking in 1–2 teaspoons of warm coconut oil to smooth it out.
If it stays grainy, start a new batch and melt gently in short bursts.
How sweet are these?
They’re moderately sweet, with balance from the peanut butter and dark chocolate. If you prefer less sweetness, use darker chocolate and reduce the maple syrup by 1 tablespoon. For sweeter cups, add another teaspoon of syrup or use milk chocolate.
Can I use crunchy peanut butter?
Absolutely.
It adds a nice texture. If you want even more crunch, add chopped nuts or pretzel bits on top of the filling before sealing with chocolate.
How do I prevent the top layer from cracking?
Don’t overfill the liners, tap the pan to release air bubbles, and let the chocolate cool for a minute before pouring it over cold layers. A small amount of coconut oil also keeps the shell flexible.
Do these travel well?
They’re best kept cold.
For parties or picnics, pack them in a chilled container with ice packs. At room temperature, they’ll soften in about 10–15 minutes depending on the weather.
In Conclusion
Frozen Peanut Butter Nutella Cups are the kind of no-bake treat you can whip up anytime and keep on hand for sweet emergencies. They’re easy, customizable, and wildly satisfying.
With a creamy center and crisp chocolate shell, each bite hits every craving at once. Make a batch today, stash them in the freezer, and thank yourself later for having the perfect little dessert ready to go.
Printable Recipe Card
Want just the essential recipe details without scrolling through the article? Get our printable recipe card with just the ingredients and instructions.